So you’ve just received your brand new tattoo machine in the mail, and you’re excited to start using it. But when you connect it to your power supply and press the foot pedal, nothing happens. Don’t worry, you’re not alone. Many beginners face this issue, and it’s usually because the machine needs to be properly tuned. In this guide, we’ll explain how to tune a tattoo machine to work, so you can start creating beautiful tattoos with ease.
Table of Contents
ToggleUnderstanding the Basics
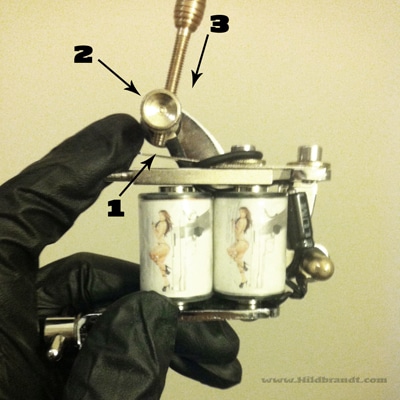
Before we dive into the tuning process, let’s familiarize ourselves with the main components involved. These components include the armature bar, contact screw, front spring, and thumbscrew. The armature bar is pointed out by arrow 1, the contact screw by arrow 2, the front spring by arrow 3, and the thumbscrew by arrow 4. These components play a crucial role in getting your machine to run smoothly.
Finding the Gap
To begin tuning your tattoo machine, you need to find the gap between the front spring and the contact screw tip. Hold the machine with your left hand and use your pointer finger to press down on the armature bar, creating a gap between the front spring and the contact screw. It’s important to note that if this gap is wider than the width of two stacked nickels, your machine may not function properly.
The general rule of thumb for the starting position is to aim for a dime gap for lining and a nickel gap for shading. This means that while holding down the armature bar, the gap between the front spring and the contact screw should be the width of a nickel for shading and the width of a dime for lining.
Adjusting the Contact Screw
Now that you’ve identified the appropriate gap, it’s time to adjust the contact screw. Arrow 2 in the image above points to the thumbscrew that locks the contact screw. Loosen this thumbscrew to release the contact screw. Arrow 3 indicates the contact screw itself. Screw it downward towards the front spring until you achieve the desired gap width for shading or lining.
Once you’ve made the adjustment, tighten the thumbscrew again to lock the contact screw in place. Release the armature bar and prepare to test your machine.
Testing Your Machine
Now that you’ve completed the tuning process, it’s time to test your tattoo machine. Set your power supply to 10V (slightly higher than normal usage). This voltage provides a good jolt for troubleshooting purposes.
If everything is properly tuned, your machine should come to life. As you can see in the image above, arrow 1 points to a dime-width gap, indicating that the machine is set to work as a liner. The dime gap for lining and nickel gap for shading is a traditional tuning method that beginners can start with.
Frequently Asked Questions
Q: Can I fine-tune my machine for different tattooing techniques?
A: Yes, as you progress in your tattooing journey, you may want to fine-tune your machine for specific techniques such as shading, color packing, or lining. This may involve considering factors like the thickness of the springs, the coil wrap, and the capacitor. Keep in mind that this guide provides a starting point for beginners.
Q: Are there any additional resources for learning about tattoo machine tuning?
A: Yes, apart from this guide, you can seek guidance from experienced tattoo artists and mentors. They can offer invaluable advice and insights to help you improve your machine tuning skills.
Conclusion
Tuning a tattoo machine is an essential skill for any aspiring tattoo artist. By properly adjusting the gap between the front spring and the contact screw and fine-tuning the machine’s settings, you can ensure smooth and reliable performance. Remember to start with the basic dime and nickel gaps for lining and shading, and don’t forget to seek guidance from experienced artists as you progress in your tattooing journey. Happy tattooing!
For more information and high-quality tattoo supplies, visit TKTX Numbing Cream Store.


